Latest from the Creator

WildnCrafty
10 days ago
The Launch Grows Near!
Firstly, I would like to say a huge thank you to everyone for your support. From the first time you decided to support this project, to every time you've mentioned it to a friend, or to any time you read an update. You’re making the difference, and I want to sincerely thank yo...
2
0
5
PROJECT UPDATE
WildnCrafty
CREATOR
1 day ago
Project Update: Funding Summary & Prototype Update
Hey Everyone! 👋
I hope you're doing well and had a very wonderful Krampusnacht week. This is a short update, but an important one! We have reached 19 backers as of 12/12/2023, and we are 24% funded!
We will also be receiving a plush build update soon - hopefully this week! Updates on the design will take a while as we figure out the exact colors and shapes needed to make the design just right, so keep an eye out for polls to help make design choices as we move forward.
Speaking of polls, I want to initiate a poll throughout Krampus' campaign to decide what to call WildnCrafty Designs followers - AKA, you! I'm still thinking of names, and here's what I have so far: Wild Ones and Crafty Crew. Add, comment, and discuss more name ideas below! I'll be closing name suggestions on December 17th.
Stay Warm and Merry Krampus!
L ~ WildnCrafty Designs
Stay Warm and Merry Krampus!
L ~ WildnCrafty Designs
CREATOR
Firstly, I would like to say a huge thank you to everyone for your support. From the first time you decided to support this project, to every time you've mentioned it to a friend, or to any time you read an update. You’re making the difference, and I want to sincerely thank you!
With that said, I would like to get to know you better! What was your first Krampus experience? Comment below!
🐐🔔
For me, the first Krampus experience I recall is from the Universal film Krampus (2015). If I recall correctly, I saw this movie for my birthday and it was such a fun feature that it really stuck with me. I read a lot about Krampus after that. I also followed local groups and found a lot of joy in that kind community. Krampus events are often full of local vendors and charities, so my idea of Krampus has expanded into more of a community ideal and it continues to bring me great joy around the holidays.
Happy Krampusnacht,
L
PROJECT UPDATE
WildnCrafty
CREATOR
10 days ago
Project Update: The First Prototype!

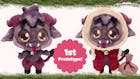
🔔 THE FIRST PROTOTYPE IMAGES HAVE ARRIVED! 🔔
The original prototype images have arrived! There are a lot of changes to make, including color adjustments and shaping. The photos in the upper left of each angle is the original prototype, while the larger images are my adjustments. Please note that the paper features in the images (like the eyes) will be embroidered, once approved. Thank you for your support, and see you in the next update!
Happy almost Krampusnaucht! 🐐🔔
⬇️Check out my note details below ⬇️
FRONT~
I Eyes:
1. Make eyes slightly larger
2. Bring down eyes slightly
II Face:
1. Add cheek fur (”long hair” fabric)
2. Make face wider at the bottom
3. Add embroidery spots for mouth line
4. Bring teeth and mouth to front only
5. Raise the nose slightly
6. Bring up mouth and tongue to meet nose
7. Tongue should be sewn piece with magnet inside. It is a detachable accessory - The top of the tongue should be curved to match the mouth embroidery
8. Oval snout
III Body:
1. Make arms slightly larger
2. Add paw embroidery
3. Make hoof cuts/divets in the front of the “feet”
4. Add flat base to hooves so they fill flat
5. Make legs and tail “long hair” fabric
6. Add lines for horn embroidery. (This may be assumed, but not shown - just wanted to check!)
IV Tail:
1. Change tail tip fabric to “long hair” fabric
COLOR EDITS~
Horns, Legs & Tail: 1. Darker maroon color - 7428 C
Added cheek fur: 1. Lighter than body color - 17-1612 TCX
Added paws: 1. Lighter than body color - 17-1612 TCX
Tongue: 1. Lighter & brighter red - 18-2120 TCX
Hooves, Tail fluff & Eyebrows: 1. Black (same as claws) - Black 6 C
Choker/Necklace: 1. Black - Black 6 C
NOTES~
Eyebrows: 1. Fabric shape embroidered on, like an outline
Paw: 1. Fabric shape embroidered on, like an outline
Eyebrows: 1. Fabric shape embroidered on, like an outline
Tongue: 1. Separated from body - magnet piece inside to attach to mouth
Arms: 1. Long enough and loose enough at the armpit to put hands together (magnets)
Legs/Hips: 1. Loose enough and slightly weighted to put the character in a sitting position
SIDE~
I Ears:
1. Wider
II Head:
1. More round and full in the back.
2. Shorter snout.
3. Slightly more plumpy hair, please.
4. Rounded and slightly lower cheeks.
5. Move teeth/tucks to front of face.
III Body:
1. Slope torso (back and stomach) inward slightly, towards hips
2. Add volume and roundness to butt/top of legs
3. Straighten legs so hooves meet the ground and are at the middle of the leg
4. Add straight/hard material to the bottom of the hooves (inside) so hooves fill flat
CLOAK~
Cloak Pattern:
1. Wider hood fluff trimming
2. Wider lower trimming
3. Larger wooly bits, more like a sherpa fabric (sample below)
Cloak Colors:
Trim: 1. Lighter white - 12-0709 TCX
Cloak: 1. More rich red - 19-1555 TCX


